ANDROID Operating System

Android is a mobile operating system initially developed by Android Inc. Android was bought by Google in 2005. Android is based upon a modified version of the Linux kernel...

What Is WEB 2.0 ?

Web 2.0 is associated with web applications that facilitate participatory information sharing, interoperability, user-centered design,and collaboration on the World Wide Web.

Social Network Services

A social networking service is an online service, platform, or site that focuses on building and reflecting of social networks or social relations among people, who, for example, share interests and/or activities.

Latest Trends N Upcoming Trends

Information technology (IT) is the acquisition, processing, storage and dissemination of vocal, pictorial, textual and numerical information by a microelectronics-based combination of computing and telecommunications...

Tips N Tricks (Various OS)

This Is crazy!! Set Processes Priority Follow this tip to increase the priority of active processes, this will result in prioritisation of processes using the CPU.CTRL-SHIFT-ESC...

Monday, March 5, 2012

New Dynamic Templates For Blogger


Blogger today launched 5 new templates that can totally transform how people view your blog.


"...These new views use the latest in web technology, including AJAX, HTML5 and CSS3, to deliver a host of benefits to you and your readers : Infinite scrolling: read more posts without having to reload or click to a second page, New layouts: different views suited to different types of blogs, Speed: download images as you view them, not all at once in advance, Interactivity: there are now more ways to experience and engage with blog content..."

Blogger Dynamic Templates Video


How to Enable Blogger Dynamic View Templates 


View Your Blog With Dynamic Templates


You can see how your blog looks with these dynamic templates by simply adding /view to the end of your URL.So to view Spice Up Your Blog using these templates this would be the URL (Click the link to check it out in a new window):

http://shaanworld2010.blogspot.com/view

Helpful Links


Blogger are still working on these amazing designs and you can give your opinion - Dynamic Templates Feedback

Check out the Blogger post on these templates - Blogger Buzz

You can also get more help - Help Center Article


Wednesday, February 15, 2012

Hosting Your Own Bidding Site Using Your WordPress Blog


You can use your WordPress blog to create an eBay-style environment, where you advertise goods for sale and flog them off to the highest bidder.
Using WordPress as an auction platform is an easy way to avoid paying seller fees and commissions to third party sites. Selling from your own website gives you full control over how you run your auction.
So how’s it done? If you want to save your pennies, a free plugin is the way to go. WP Auctions allows you to create a bidding system on your WordPress blog, using widgets and an AJAX popup form.
The plugin is written by Owen Cutajar and Hyder Jaffari from Weborithm, and the free version is available through the WordPress Plugins Directory.

Setting it up


This is a step-by-step guide to installing the plugin and setting up an auction on your WordPress site. Note that you’ll need to be running WordPress 3.0+ for this plugin to work correctly.

You can upload the plugin via the WordPress dashboard or an FTP client. Once WP Auctions is installed, you need to activate it in the ‘plugins’ panel.

From there, go to your widgets interface and drag your new WP Auctions widget into your sidebar (or wherever you prefer to place it – on some blogs it might fit better in the footer or header).


You’ll now find your new WP Auctions menu in the left sidebar of your WordPress dashboard.

Before you create an auction


In the ‘general settings’ interface of the WP Auctions menu, you’ll need to nominate a currency and PayPal account for your auctions, as well as contact details for bid notification. PayPal is currently the only payment gateway supported in the free version of this plugin.

You can add a custom bidding increment here too, so that each bid must go up by $5 or $10 or whatever you choose.
For added security, you can also require that all bidders have a registered WordPress account, which will reduce the number of fake and spam bids that your auction attracts.
This security feature is optional, however, and you’ll surely get more interest in your auctions if you leave them open to everyone.
In the ‘other settings’ panel, you can choose from one of five color schemes for you auction. The scheme shown in this tutorial is ‘earth’.

Creating an auction

Once you’ve got your general settings configured, you can create your first auction under the ‘add’ menu in WP Auctions.
In the ‘Auction Details’ panel you’ll need to specify the following information:
  • A name and description for your auction
  • Your starting price
  • The date and time at which bidding closes
  • How you will accept payment (only PayPal in the free version)
  • You also need to upload a photo for your auction


If applicable, you can include shipping information here too: where the product will be sent from, locations you are able to send it to, and how much extra it will cost.
The ‘optional settings’ interface allows you to set a ‘buy it now’ price for your auctioned goods, and post additional photos of the product you’re selling.
Once you’ve created your auction, this is what it will look like on your blog:

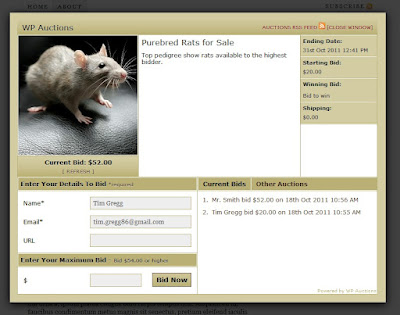
Nice and simple. Clicking on the ‘Bid Now’ button will take users through to this AJAX-powered popup screen, where they can place their bid and leave a contact email address.


Embed your auction in a post or page


Instead of displaying your auction in a sidebar widget, you can embed it in a post or page of your blog instead. This might suit you better if the auction is a one-off event that will only run for a couple of days. It’s fairly straightforward to do this – instructions can be found in the WP Auctions FAQ.
This is what an auction looks like embedded in a blog post:

Collecting payment


Use WordPress like eBayWhen your auction ends, an email is automatically generated and sent to the winning bidder. You can customize the message in the WP Auctions control panel in your dashboard. The email includes a link to a PayPal order summary, where the bidder can review their purchase and make payment.
From this point on, it’s between yourself and the winning bidder to arrange postage and shipment of the goods.


The Verdict on WP Auctions


In three words: very, very simple. Whether this is a good thing or a bad thing depends on what you’re trying to do.
If all you want is a basic buy-and-sell auction system that fits easily into your existing WordPress setup, then WP Auctions has everything you’re likely to need.

The good points…


The WP Auctions interface is intuitive and user-friendly. Even the newest of WordPress newbies shouldn’t have any trouble using this plugin.
Unlike some other auction and marketplace plugins, with WP Auctions you don’t need to modify the structure of your site or use a special WordPress theme. The plugin is designed to work harmoniously with any kind of site design.


The main drawback of WP Auctions is limited functionality. The free version only allows you to run a basic “highest bidder wins” model, which is fine for selling physical products but doesn’t leave you with many other options.

On the downside… 


How To Do It?


How To Build WP_AUCTION?


Thanks To : Tim Gregg 

Monday, October 31, 2011

Microsoft Windows Developer Preview


The Windows 8 Developer Preview is a pre-beta version of Windows 8 for developers. These downloads include prerelease software that may change without notice. The software is provided as is, and you bear the risk of using it. It may not be stable, operate correctly or work the way the final version of the software will. It should not be used in a production environment. The features and functionality in the prerelease software may not appear in the final version. Some product features and functionality may require advanced or additional hardware, or installation of other software.
Note: You can't uninstall the Windows 8 Developer Preview. To go back to your previous operating system, you must reinstall it from restore or installation media.


Windows 8 Developer Preview with developer tools English, 

64-bit (x64)


DOWNLOAD (4.8 GB)

Sha 1 hash - 6FE9352FB59F6D0789AF35D1001BD4E4E81E42AF
All of the following come on a disk image file (.iso). See below for installation
instructions.
  • 64-bit Windows 8 Developer Preview
  • Windows SDK for Metro style apps
  • Microsoft Visual Studio 11 Express for Windows 8 Developer Preview
  • Microsoft Expression Blend 5 Developer Preview
  • 28 Metro style apps including the BUILD Conference app

Windows 8 Developer Preview English, 64-bit (x64)


DOWNLOAD (3.6 GB)

Sha 1 hash – 79DBF235FD49F5C1C8F8C04E24BDE6E1D04DA1E9
Includes a disk image file (.iso) to install the Windows 8 Developer Preview and
Metro style apps on a 64-bit PC.
Note: This download does not include developer tools. You must download the
Windows 8 Developer Preview with developer tools 64-bit (x64) to build Metro
style apps.

Windows 8 Developer Preview English, 32-bit (x86)

DOWNLOAD (2.8 GB)
Sha 1 hash - 4E0698BBABE01ED27582C9FC16AD21C4422913CC
Includes a disk image file (.iso) to install the Windows 8 Developer Preview and
Metro style apps on a 32-bit PC.
Note: This download does not include developer tools. You must download the
Windows 8 Developer Preview with developer tools 64-bit (x64) to build Metro
style apps.

Live SDK

The Live SDK provides a set of controls and APIs that enable applications to
integrate Single Sign On (SSO) with Windows Live ID and access information
from SkyDrive, Hotmail and Windows Live Messenger. To learn more,
sign up for our technical preview.

System Requirements

The Windows 8 Developer Preview works great on the same hardware that
powers Windows Vista and Windows 7:
  • 1 gigahertz (GHz) or faster 32-bit (x86) or 64-bit (x64) processor
  • 1 gigabyte (GB) RAM (32-bit) or 2 GB RAM (64-bit)
  • 16 GB available hard disk space (32-bit) or 20 GB (64-bit)
  • DirectX 9 graphics device with WDDM 1.0 or higher driver
  • Taking advantage of touch input requires a screen that supports multi-touch
  • To run Metro style Apps, you need a screen resolution of 1024 X 768 or greater

Notes about installing the Windows 8 Developer Preview

A clean install is supported on all builds, but you can upgrade if you are installing a
download without the developer tools. You will receive the full set of migration
options when setup is launched in Windows. To dual-boot, you must first boot from
media and choose an alternative partition.


How to install the Windows 8 Developer Preview from 
an ISO image
The Windows 8 Developer Preview is delivered as an .iso image that must be
converted into installation media stored on a DVD or a USB flash drive. On
Windows 7, the easiest way to convert this file is to use Windows Disc Image Burner.
On Windows XP and Windows Vista, a third-party program is required to convert
an .iso file into installable media—and DVD burning software often includes this
capability.

Note: The .iso file that contains the developer tools requires a large capacity DVD
called a DVD-9, as well as a DVD burner that can handle dual-layer (DL) DVDs.
Most modern burners should be able to handle this format.


Reference : @Microsoft.com

Friday, July 22, 2011

Making registration simple and social in just a few steps


Today we're launching a new registration plugin that gives website owners the ability to offer quick, easy and social options for sign-up.
It is an excellent alternative to using Facebook Login (formerly Facebook Connect) when:
  • you want to provide an option for users without Facebook accounts
  • your site needs additional information that Facebook doesn't provide
  • a traditional HTML form suits your site more
By minimizing the friction associated with signing up for a new account and making it easy for people to bring their friends with them, we've seen that people are more likely to complete the sign up process, stay on sites longer, share more content, and come back more often. For example, in beta tests with FriendFeed, Facebook sign ups increased 300%.
How it works
The registration plugin is an iframe that websites can add with just one line of code, and customize to request the specific fields required to create an account. When a user is logged into Facebook and arrives at the registration plugin on a website, they'll see that the form is prefilled with the relevant information he or she has already shared on their Facebook profile. Users can see the specific information the site is requesting of them, giving them more control to decide whether to sign up.
The site can request information stored on Facebook (e.g., name, verified email address, current location, etc.) or custom information (e.g., text fields, checkboxes, dropdown menus, security checks, typeaheads, etc.). Users can decide whether to share their information with the site by clicking "Register," or if a Facebook account isn't required by the site, select an option to fill out the form manually. Because the plugin works through an iframe, no data is shared with the website until the user clicks "Register."
When a user registers for the site with their Facebook account (similar to Facebook Login), the site is given permission to access the user's basic information on Facebook in addition to the data presented in the form, and in turn can provide the user with a personalized and social experience.
Getting started
To integrate the registration plugin, simply add the iframe or XFBML to your site:
Using iframe:
<iframe src="http://www.facebook.com/plugins/registration.php?
client_id=113869198637480&
redirect_uri=http%3A%2F%2Fdevelopers.facebook.com%2Ftools%2Fecho%2F&
fields=name,birthday,gender,location,email"
scrolling="auto"
frameborder="no"
style="border:none"
allowTransparency="true"
width="100%"
height="310px">
</iframe>
The redirect-uri should point to the page which will process your signed_request. You can customize the fields attribute to suit your needs. See the docs for a list of valid fields.
Using XFBML:
<fb:registration
fields="name,birthday,gender,location,email"
redirect-uri="http://developers.facebook.com/tools/echo/">
</fb:registration>
The redirect-uri and fields are identical to above. You must use your own app_id for the redirect-uri to be on your domain.
For more details on getting started with your implementation, please visit our technical documentation.
We hope you'll try it out and let us know what you think.

Related Posts Plugin for WordPress, Blogger...

About Me

My photo
"BLOGGING" is my passion. I am crazy about it. I love to share knowledge with others, So I found this platform is good to share knowledge with everyone. And also I like to surf net a lot to search for the latest technologies and gadgets.